• Submit Ticket
  • My Tickets
Themeix Support Portal
  • Submit Ticket
  • My Tickets

Docs: Doxy WordPress Theme

/WordPress Themes / Doxy WordPress Theme /
  • WordPress Theme Installation
  • Doxy theme Resource
  • Theme Customizer for Doxy WordPress Theme
  • Add New Documentation in Doxy
  • Doxy Required Plugins and Installation
  • Translation Guide
  • My changes do not appear online, what can i do?
  • Create A New Contact Form
  • Adding Blog Posts
  • Set Static Home Page
  • Adding Static Pages
  • Setup Navigation Menu
  • Why Icon is Missing?
  • Import Demo Data
  • System Requirements
  • Doxy WordPress Theme Changelog

WordPress Theme Installation

WordPress theme installation is a really simple process and when you are using Doxy WordPress theme then its become easier steps. If you don’t have any idea about WordPress theme installation process, please see the blog post How to install WordPress theme?

In order to install that WordPress theme please follow the steps below :

Step 1: At first Login to your website as an administrator. Then go to Dashboard > Appearance and then Click on Themes Menu.

Step 2: Now click on Add New button from the top area of the Themes menu Page.

Step 3: Now you will get an interface to upload the theme. Upload our theme’s zip file there.

Step 4: After uploading the theme file in your WordPress admin area, click on the Install Now button there.

After a successful installation of the theme, click on the Activate button and then your site will be ready to use our theme.

Open in New Tab

Doxy theme Resource

The following plugins are the fundamental part of the Doxy theme:

  • Elementor Website Builder
  • Doxy Elementor Addons
  • Redux Framework
  • CMB2
  • Contact Form 7

To better understand their work and have detailed info, please visit the following docs:

  • Elementor Page Builder
  • Redux Framework
  • CMB2
  • Contact Form 7

Open in New Tab

Theme Customizer for Doxy WordPress Theme

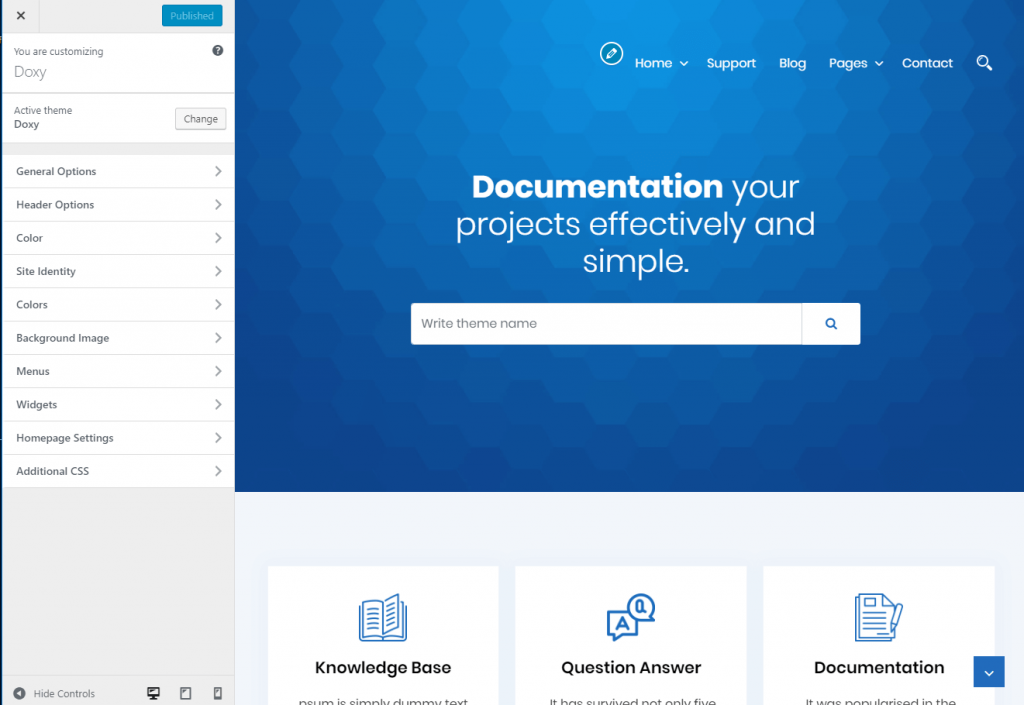
WordPress customizer is a tool which allows you to change the look and feel of your website. You can see the changes live as you edit the options. To open it, go to Appearance > Customize.

Site Identity

This is where you can set different things:

  • Upload a site logo.
  • Set the Site Title and Tagline.
  • Upload the site icon (favicon) which used as a browser and app icon for your site.
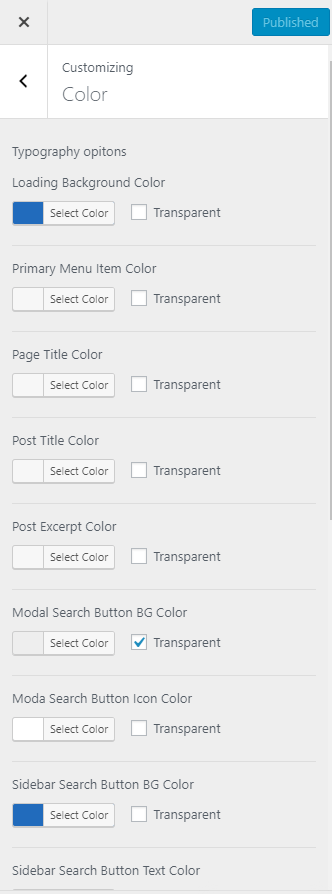
Color

Here you can change the theme colors.

Menus

Here you can create a new menu, add links to it set the menu location.

Widgets

This will help you control the supported widgets in the site footer, you can add a new widget or remove one.

Homepage Settings

Here you can set the homepage for your website. It could be the blog page with a list of posts, or it could be a page like the about page for example.

Additional CSS

This is a great place if you want to add more CSS styling to your website.


Open in New Tab

Add New Documentation in Doxy

How can you add new documentation?

Doxy is a WordPress knowledge base documentation theme. You can add your documentation by following these easy steps.

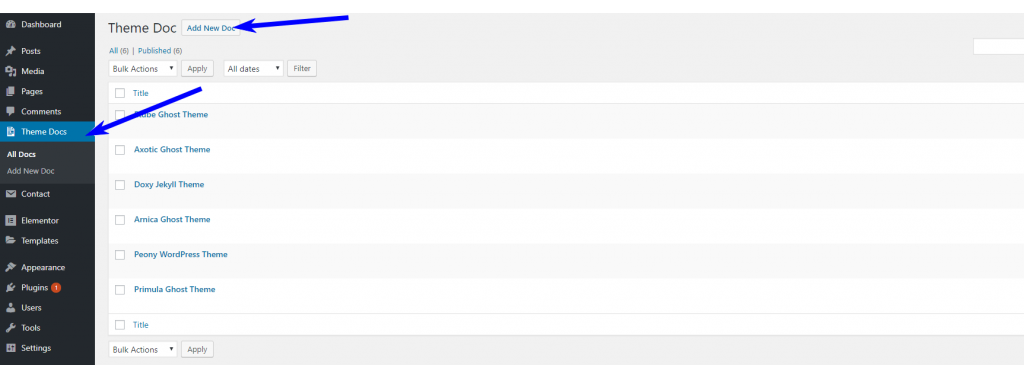
When you complete Doxy theme installation process, you will get  a menu item which name is Theme Docs.

Step-1: Click on Theme Docs

Step-2: Then Click on Add New Doc

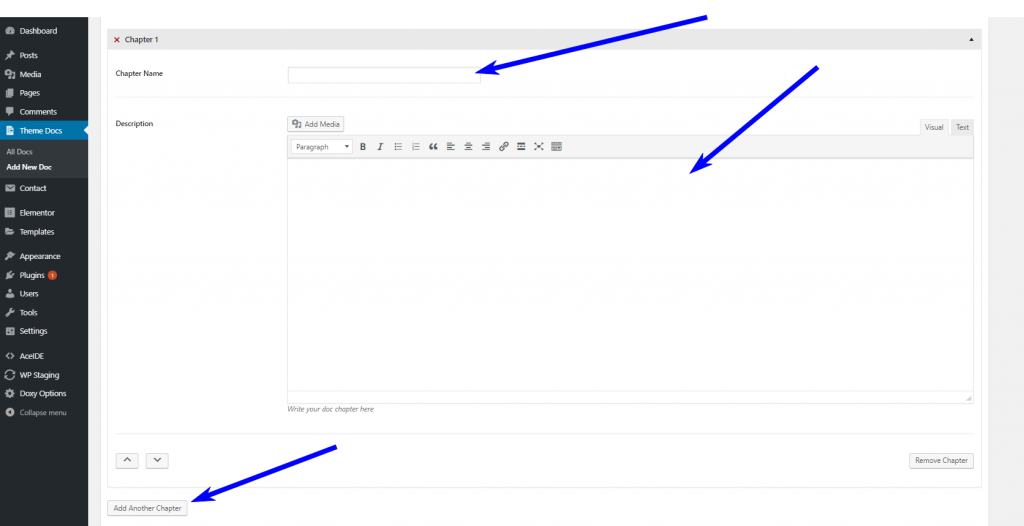
Step-3: Now input theme short description in this filed

Step-4:  Add your documentation by chapter wise.if you want to add more chapter just click on Add New Chapter


Open in New Tab

Doxy Required Plugins and Installation

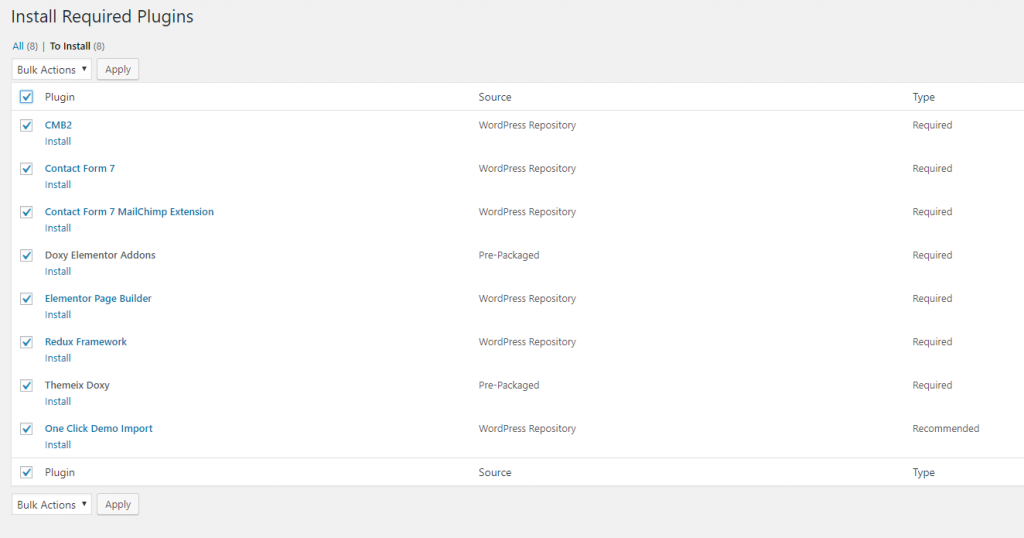
In Doxy WP theme, you will need to add some required plugins to use all the theme features like the demo website. You need to install and activate the required plugin immediately after activating our theme. All required plugins are included in the Doxy WP theme.

Here following the name of Required plugins for Doxy WP :

  • Redux Framework
  • One Click Demo Import
  • MailChimp For WordPress
  • Contact Form 7
  • Elementor Page Builder
  • Themeix Doxy
  • Doxy Elementor Addons
  • CMB2

Install the plugins from your Dashboard. You will see the notification to install all required plugin. Now click Begin installing Plugins and then it will take you the installation page automatically.

Now select Install and check all these plugins then click Appy button

Now activate All of these plugins and Enjoy!


Open in New Tab

Translation Guide

That theme is fully ready to be translated into other languages and could be easily translated with poedit.net application/software.

There have the .pot file inside the languages directory which will be used by the poedit application.

Here are simple steps:

  • Install poedit and open it.
  • Once the app is opened click Create new translation.
  • Choose the pot file inside the theme themename/language directory.
  • Once the translation is done, save the file according to your language code. Find a list of language codes at WordPress in your Language.
  • When that’s done, simply upload the files to themename/language folder using FTP.
  • Change the site language by going to WordPress > General > Settings and choose the target language from Site Language drop-down menu.

Open in New Tab

My changes do not appear online, what can i do?

  • If your styles are not applied after saving them, it might be due to a caching issue. When your styles are not applied online, please regenerate the CSS via Elementor > Tools > Regenerate CSS on your WordPress Dashboard, then make sure that you clear your WP cache (your WP plugin if you have one), your server cache (if you have one. In this case, you can contact your hosting provider), and your browser cache, after that you save changes: https://codex.wordpress.org/I_Make_Changes_and_Nothing_Happens
  • In some cases, it will be possible to solve the issue by switching the CSS print method in “Elementor > Settings > Advanced” on your WordPress Dashboard.
  • SVG images are not displayed if they do not have a width set in pixels.
  • HTML tags which are not closed can also lead to layout issues so if you added some HTML code in the HTML widget or in another widget, make sure that all your tags are properly opened and closed.

Open in New Tab

Create A New Contact Form

Click on Contact > Contact Forms. Here you will see the central administration panel where you can manage multiple contact forms. You will also find the Contact Form 7’s default contact form, labeled Contact Form 1.

Contact Form 1 contains all the fields a basic contact form may need. This form is ready to use and can be inserted into any page and post of your website, if you wish (this is covered further on).

Alternatively, you can create your own contact form by selecting Contact > Add New.

Creating a new contact form

Give your new contact form a name, and then scroll down to Form. Here you can edit the new contact form template.

Your template defines the various fields that will appear on your form, as well as the labels that appear next to those fields.

By default, Contact Form 7 adds a number of fields to new forms, including name, email, subject, message and send. More than likely, you will want to keep all of these fields.

now save it.Visit Contact Form 7 for more details


Open in New Tab

Adding Blog Posts

  • Go to Posts → Add New.
  • Add a title.
  • Select a post Category.
  • Add some relevant Tags.
  • Choose a Featured Image.
  • Write your post content in the content area.
  • Click Publish and you’re all done.

Open in New Tab

Set Static Home Page

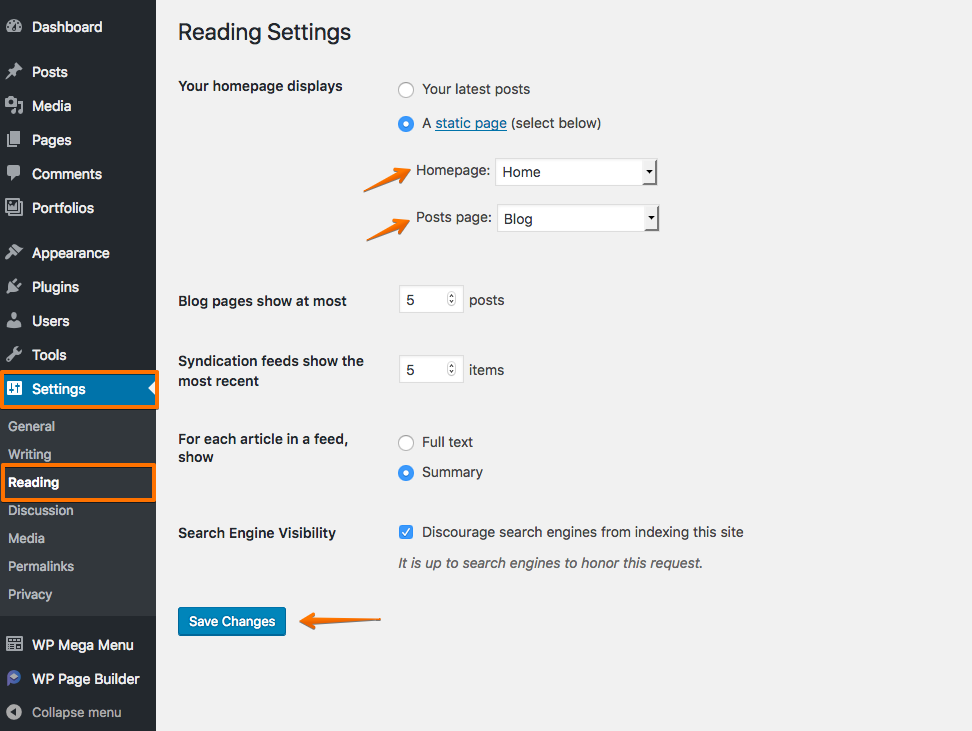
WordPress may show the latest blog posts on the front page after a fresh install. If you want to make it look like or demo site, then you need to set a static Home Page. To do so, navigate to Dashboard > Settings > Reading. On that page, choose “A static page” from the “Your homepage displays” section. From the drop-down menu, select the page Home for Homepage and the page Blog for the Posts page.

Setup Permalink (Required)

Make sure to configure the permalink structure. By default, WordPress generates web URLs having question marks and lots of numbers in them. However, WordPress offers you the ability to create a custom URL structure for your permalinks and archives. This can improve the readability, usability, and forward-compatibility of your website links.

From WordPress admin panel go to the following path, Settings > Permalink then select “Post name” (or any other depending on your choice) as the permalink structure for your WordPress site.


Open in New Tab

Adding Static Pages

  • Go to Pages → Add New.
  • Add a title.
  • Set the Page Attributes like the Parent or leave the default one.
  • Choose a Featured Image.
  • Write your post content in the content area.
  • Click Publish and you’re all done.

Open in New Tab

Setup Navigation Menu

  • Navigate to WordPress Dashboard > Appearance > Menus
  • You can see a panel where you can create a new menu, click create a new menu link to create one.
  • Give the new menu a name, for example, Primary Menu, then click the Create Menu button to create it.
  • From the drop-downs on the left, choose the content to add to your menu.
  • Nest & position menu items by dragging & dropping them.
  • Be sure to check the box to set the menu as “Primary Menu” from the Display location option.
  • Save menu

Open in New Tab

Why Icon is Missing?

After installing the demo content, you may face issue font awesome 4 issue. Because by default elementor work with Font Aesome 5. But we really feel comfort with Font Awesome 4. Becuase its Full FREE!

So here is the steps to fix it.

01) At first open Elementor Settings Page
02) Now select the Advanced tab
And the select “Yes” for the option “Load Font Awesome 4 Support”, Then click the button Save Changes.


Open in New Tab

Import Demo Data

Import Demo Automatically

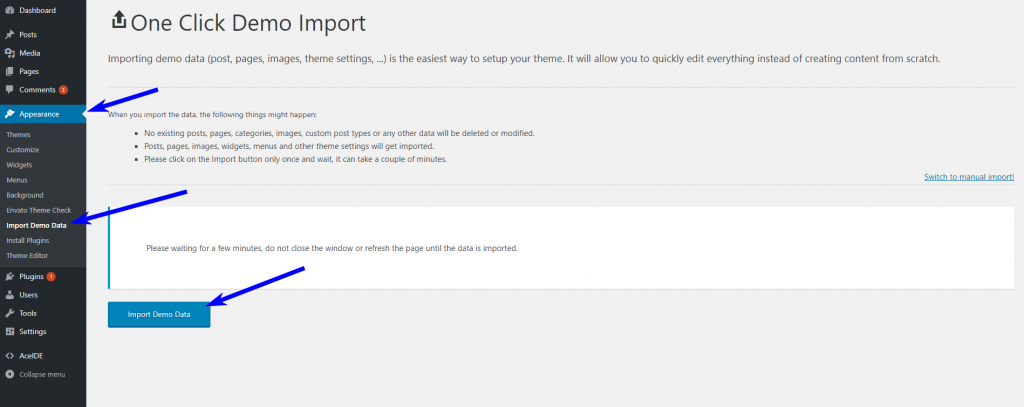
Importing demo data on our WordPress theme is very simple. Go to the Dashboard and select Appearance->Import Demo Data then  Click on “Import Demo Data”, save the changes when it’s done.

If you’ve already used the One Click Demo Install, then you no longer need to import demo manually. In case you don’t use the Demo Importer, then follow the next section to import data manually.

Import Demo Manually

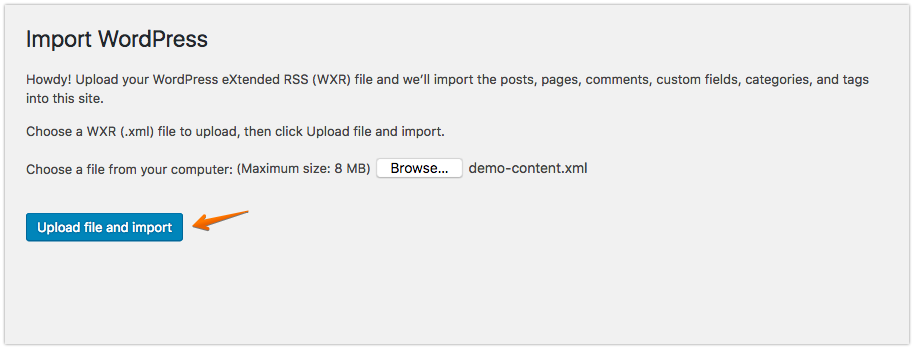
If you want to go with the demo data which is available on the theme, then you’d need to import the sample data. To import the sample data manually, first go to the left sidebar (Dashboard), then choose Tools > Import > WordPress > “Install Now” (from the list), once you’ve clicked “Install Now” you’ll see the button changed to “Run Importer” click on it now. Then you will see the “Import WordPress” option which allows you to upload a .xml file from the Demo Content folder (file name: demo-content.xml) found inside the extracted folder that you get from the download theme package (a zip file).

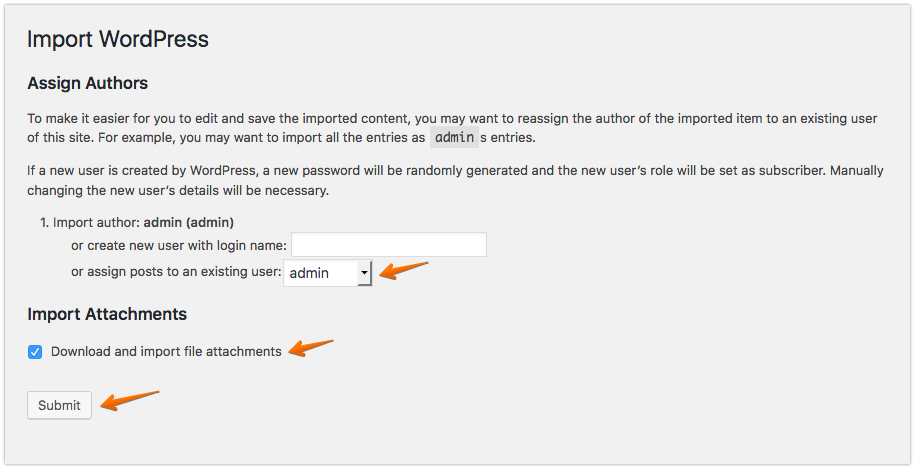
Once you imported the demo-content, you’ll be presented with another screen where you’d need to select the user and check mark download attachment, then finally click “Submit”. Check out the following screenshot.


Open in New Tab

System Requirements

To use that WordPress theme properly, you need to have WordPress 4.0 (or higher version) site with PHP 5.4 (or higher version) running on your hosting server. If you don’t have WordPress installed in your server, get a managed WordPress hosting from us? We are providing very low cost but powerful WordPress hosting for our customers. For help regarding WordPress installation please see that codex link

Here following some more important resources from Codex :

  • First steps with wordpress
  • Installing WordPress


Open in New Tab

Doxy WordPress Theme Changelog

Here is the details changelog of the Doxy WordPress Theme. If you don’t have the latest version please download it from your account.


V3.6.0 (07 Dec, 2021)
** Fix Demo Import Bug
** Plugin Updates

V3.5.0 (30 Dec, 2020)
** Demo Update
** Plugin Updates
** Doc Page Updated

V3.4.0 (04 Jan, 2020)
** Demo import bug fixed

V3.3.4 (12 Oct, 2019)
** Themeix License add + Online Updater included

V3.3.3 (12 Oct, 2019)
** Demo Improved

V3.3.2 (04 Sep, 2019)
** New Option added to turn off Social Share from Blog Post
** New Option added to turn off Author Box from Blog Post

V3.3.1 (03 Sep, 2019)
** Google Analytics Code Bug fixed
** Doxy Elementor Addon plugin updated

V3.3.0 (22 Aug, 2019)
** Menu Bug fixing for IE
** Home Slider Button Link Issue Fixed
** Missing language pot file added to language folder

V3.2.0 (26 July, 2019)
** Doc page header image change option added
** Doc page footnote option added 
** Required software versions updated

V3.1.0 
** Sevaral Bug Fixed

V3.0.0 (16 June, 2019)
** NEW VERSION - with ACF
** Dropped CMB2 for the metabox
** ACF added for the metabox
** Editors and new features added in Doc
** Syntax Highlighter bug fixed
** New Add-ons added for elementor 


V2.2.0 (07 May, 2019)
** Breadcrumb added for the docs

V2.1.0 (27 April, 2019)
** Tons of New options added in theme option
** Child theme added

V2.0.0 (22 April, 2019)
** Support System Integrated  with Doxy Awesome Support
** QA Forum Integrated with DW Question & Answer
** Print Feature Added for the Docs
** Syntax Highlighter (Prism) Added
** Conditional Background Options for the Page/Post Header Added
** Un-necessary Code Removed
** Doxy Full Width Template Bug Fixed
** Single Doc Page Design and Functionality Improved
** Elementor Compatibility issue fixed
** Design Improved


V1.0.0 (20 April, 2019)
** Initial Release

Open in New Tab

©2016 - 2021 Themeix. All Rights Reserved.
Loading...

Insert/edit link

Enter the destination URL

Or link to existing content

    No search term specified. Showing recent items. Search or use up and down arrow keys to select an item.