Newsx Ghost Theme is a powerful and responsive Ghost theme specially designed for creating modern news and magazine websites. Whether you’re building a personal blog, an online magazine, or a professional news portal, this Ghost theme helps you launch a clean, fast, and visually appealing site with ease.
With the Newsx Premium Ghost Theme , you can create a fully functional and SEO-optimized news or blog website in minutes. This theme offers a polished, minimalistic layout that ensures a seamless reading experience across all devices.
Why Choose Newsx Ghost Theme?
Magazine-style layout perfect for editorial content, breaking news, and featured stories
Fully responsive and optimized for mobile users
Clean design focused on readability and performance
Ideal for Ghost-powered news websites, magazine blogs, or viral content platforms
Easy to customize and SEO-ready out of the box
Newsx is more than just a blog theme – it’s a complete solution for launching your professional news or magazine website using the Ghost CMS. Whether you’re a journalist, editor, or blogger, Newsx helps your content shine with a clean and professional look.
Start your publishing journey today with the Newsx Ghost Theme and take your online news platform to the next level.
Loading content...
Loading content...
Loading content...
Loading content...
Loading content...
Loading content...
Loading content...
Loading content...
Loading content...
Table of Contents
Select an article to see its table of contents
Quick Navigation
Documentation Generated by: ThemeixDate: January 21, 2026
Ghost Theme Installation
Installing Your Ghost Theme
Follow these simple steps to install your new Ghost theme:
1. Log in to your Ghost Admin Panel
Go to your blog’s admin URL (for example: yourwebsite.com/ghost).
This will take you to the themes area of your Ghost admin panel.
3. Upload Your Theme
Click the Upload a Theme button.
An upload window will appear.
Find the theme ZIP file (for example, sinju.zip) in your downloaded package.
Drag and drop the ZIP file into the upload area, or click to browse and select it.
4. Activate the Theme
Once the upload is complete, click the Activate Now button.
Your new theme is now live on your site!
That’s it! Your Ghost site should now be using the new theme. If you have any issues, double-check that you uploaded the correct ZIP file and that the upload finished successfully.
Create a Ghost Content Key
How to Create a Ghost Content API Key
To use this theme and connect your site to Ghost’s Content API, you need to generate a Content API Key from your Ghost admin panel. This key allows your website or theme to securely fetch content from your Ghost blog.
Follow these steps to create your Content API Key:
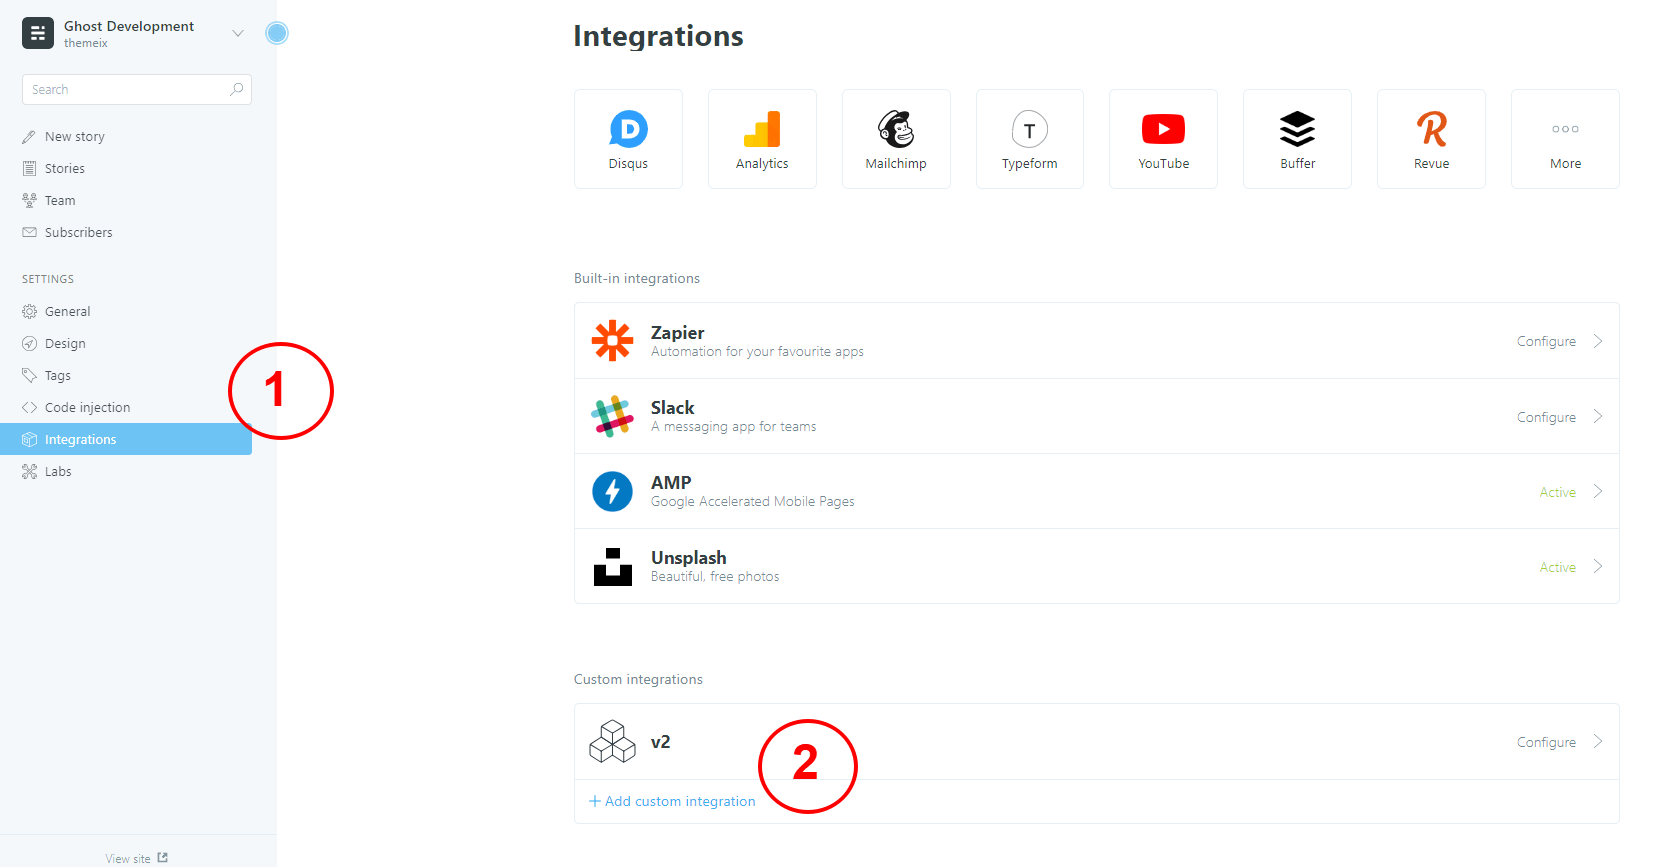
1. Open the Integrations Section
Log in to your Ghost Admin Dashboard.
In the left sidebar, click on Integrations. This is where you manage connections between Ghost and external services or custom themes.
2. Add a Custom Integration
Click the Add custom integration button.
3. Name Your Integration
Enter a name for your new integration. You can use any name that helps you remember what it’s for (e.g., “My Theme Content Key”).
Click Create to proceed.
4. Copy Your Content API Key
After creating the integration, Ghost will display several keys. Look for the Content API Key.
Hover over the key and click the copy icon to copy it to your clipboard.
Tip: Keep this key safe. You’ll need it to connect your theme or site to your Ghost content.
Setup Navigation
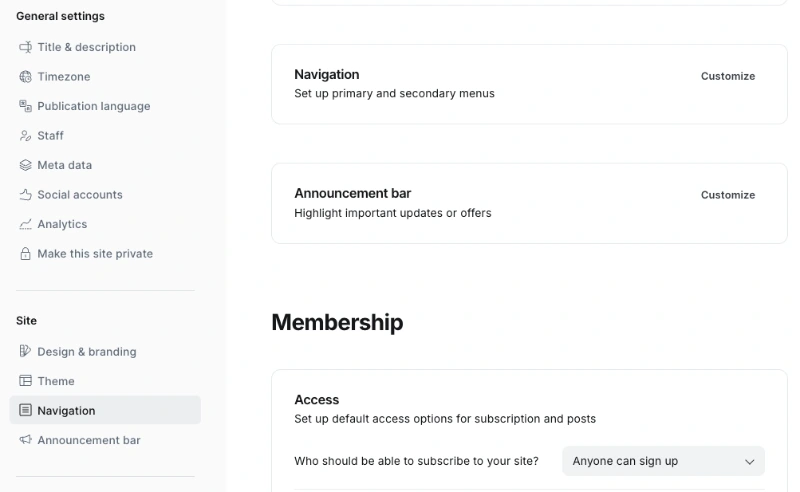
Managing your site’s navigation in Ghost is simple and user-friendly. You can add, remove, reorder, or edit menu items directly from the Ghost Admin Panel, without editing any code.
Navigation Settings
To access the navigation settings:
Log in to your Ghost Admin Panel
Go to Settings > Site
Scroll down to the Navigation section
Example direct link: yoursite.com/ghost/#/settings
Adding or Editing Menu Items
Within the Navigation section, you can fully customize your site’s menu:
Add new items – Enter a Label (the menu name) and its URL.
You can use external links or internal paths (e.g., /about/, /contact/).
Edit items – Click into any label or URL field to update it.
Reorder items – Drag and drop menu rows to change the order.
Remove items – Delete a row to remove it from the menu.
Important Notes
Always click Save after making changes.
If you navigate away without saving, your updates will be lost.
Ghost supports both a Primary Navigation (main site menu) and a Secondary Navigation (footer or additional menu). Make sure to update the correct section.
By following these steps, you’ll keep your site’s navigation clean, intuitive, and up to date with the latest Ghost features.
Featured Post Option
Ghost CMS provides a Featured Post option that allows you to highlight specific content on your site. In themes that support this functionality (including ours), featured posts are displayed prominently on the frontend.
How Featured Posts Work
If you have more than one featured post, they will automatically be displayed on the theme. This is a great way to draw attention to important content, such as announcements, popular articles, or cornerstone content.
How to Mark a Post as Featured
To mark a post as featured:
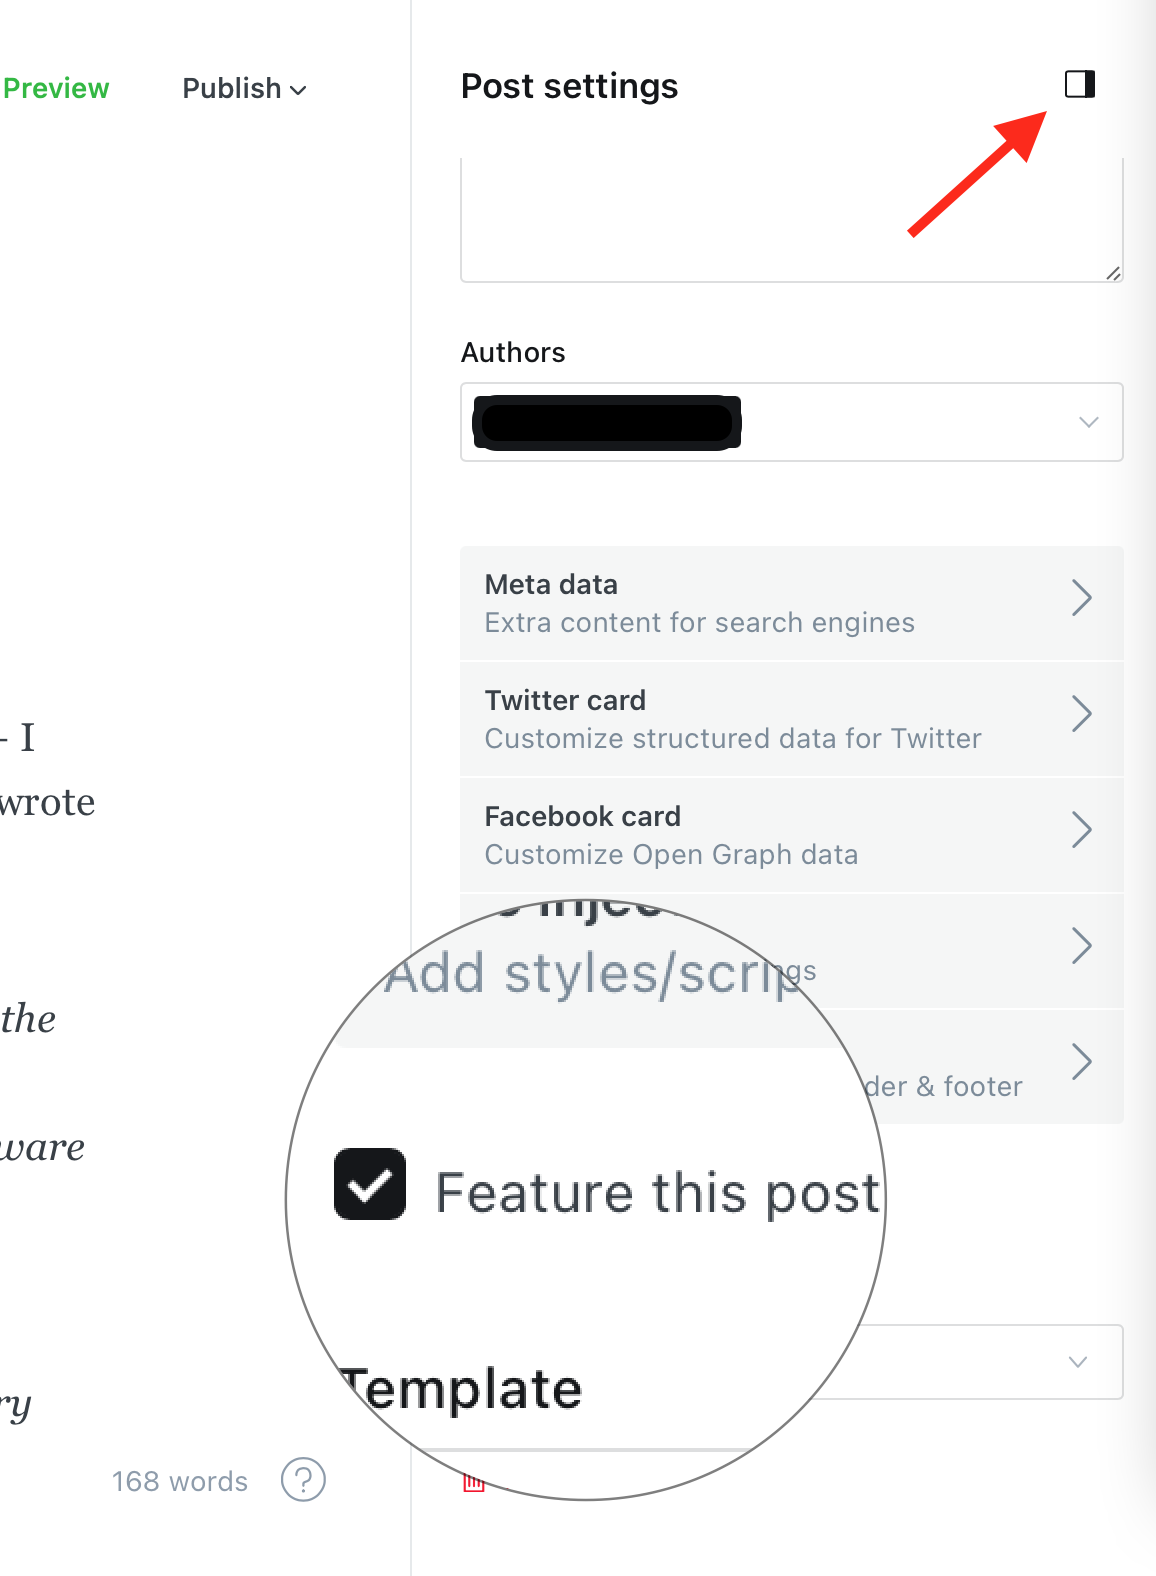
Open the post you want to feature in the Ghost Admin Panel.
Click the Post Settings gear icon in the top right corner.
Enable the “Feature this post” option by checking the box.
Once a post is marked as featured:
It will appear in the featured section of your site’s homepage or designated area (depending on your theme).
Styling and Customization
Since featured posts receive the feature class, you can target them specifically in your CSS for custom designs — such as different backgrounds, font styles, or animations.
Using featured posts effectively can help improve engagement and guide your readers to the most important content on your website. Be sure to keep the section updated with fresh or strategic posts to make the most of this feature.
Create Tags Page
Ghost CMS allows you to create custom pages using templates, including one that can automatically display all your tags. This is useful for organizing your content and helping visitors explore topics on your site.
Steps to Create a Tags Page
Follow the steps below to create a dedicated Tags page:
Log in to your Ghost Admin Dashboard.
Navigate to the Pages section.
Click the “New Page” button to create a new page.
Name the page something like “Tags” or “Explore Tags” - whatever fits your site’s style but make sure page slug/permalink is tags.
How it works
After assigning the tags page:
The page will automatically display all available tags on your site.
Each tag will typically be linked to its own archive page, allowing users to browse content by tag.
The layout and style of the tags page will depend on how the tags.hbs template is defined in your theme.
By using this method, you can easily create a dynamic Tags page that updates automatically as you add new tags to your content.
How to Add Analytics Code or Any Custom Script to the Header
Adding analytics or other third-party scripts (like Google Analytics, Facebook Pixel, Hotjar, or custom JavaScript/CSS) to your Ghost website is easy and doesn’t require editing the theme files directly.
Follow these steps to safely inject custom code into the header of your Ghost site:
Step 1: Log in to Your Ghost Admin
First, log in to your Ghost Admin panel. This is usually accessible at:
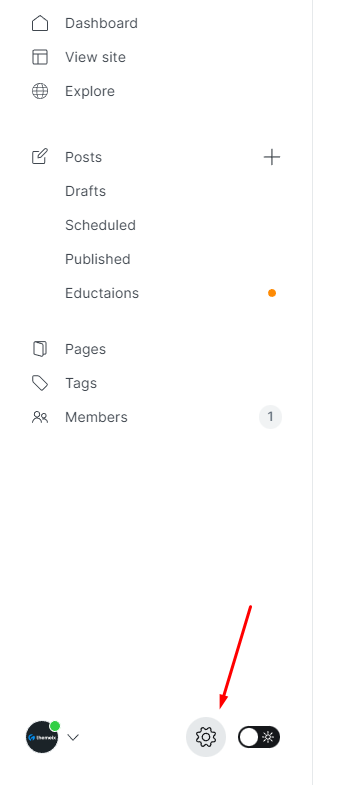
Once logged in, click on the Settings icon located in the left sidebar.
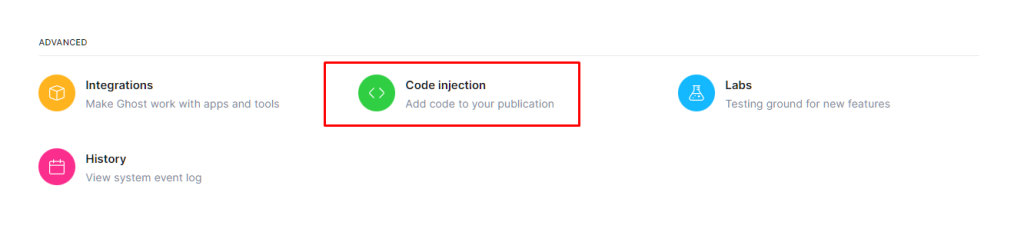
Step 2: Go to Code Injection Settings
In the Settings panel, scroll down to the Advanced section. Click on Code Injection.
This area allows you to safely inject custom code into your site’s <head> and <footer> sections without modifying your theme files.
Step 3: Paste Your Script into the Header Field
Under the Header section, paste your Google Analytics code, tracking scripts, meta tags, custom CSS, or any other header-level scripts.
This code will be automatically added to the <head> section of every page on your site.
Example: Google Analytics Script
Here’s a sample script you can paste into the Header field to enable Google Analytics:
<!-- Google Analytics --><script
asyncsrc="https://www.googletagmanager.com/gtag/js?id=UA-XXXXXXX-X"></script><script>window.dataLayer=window.dataLayer||[];functiongtag(){dataLayer.push(arguments);}gtag("js",newDate());gtag("config","UA-XXXXXXX-X");</script>
Replace UA-XXXXXXX-X with your actual Google Analytics Tracking ID.
Create Authors Page
Creating an Authors page in Ghost CMS allows you to showcase all the contributors to your site in one place. If your theme includes a custom authors.hbs template, you can easily use it to automatically generate a list of all authors.
Steps to Create a Authors Page
Follow the steps below to create a dedicated Authors page:
Log in to your Ghost Admin Dashboard.
Navigate to the Pages section.
Click the “New Page” button to create a new page.
Name the page something like “Authors” or “Team” - whatever fits your site’s style but make sure page slug/permalink is authors.
How it works
After assigning the authors page:
The page will automatically display all available authors on your site.
Each author will typically be linked to its own archive page, allowing users to browse content by author.
The layout and style of the tags page will depend on how the authors.hbs template is defined in your theme.
By using this method, you can easily create a dynamic Tags page that updates automatically as you add new tags to your content.
Contact Page
Creating a functional and visually appealing Contact page in Ghost is simple. Follow the steps below to get started:
Step 1: Create the Contact Page
Log in to your Ghost Admin Dashboard.
Navigate to the Pages section and create a new page titled Contact.
Add your desired content using the Ghost editor. This can include a short message, contact instructions, or location information.
Step 2: Add a Contact Form
To make your Contact page functional, you can integrate a form. Below are three recommended tools to easily add a contact form to your Ghost site:
You can customize the appearance of your form by adding inline styles or editing your theme’s CSS. Here’s a quick example for custom button and element colors: